
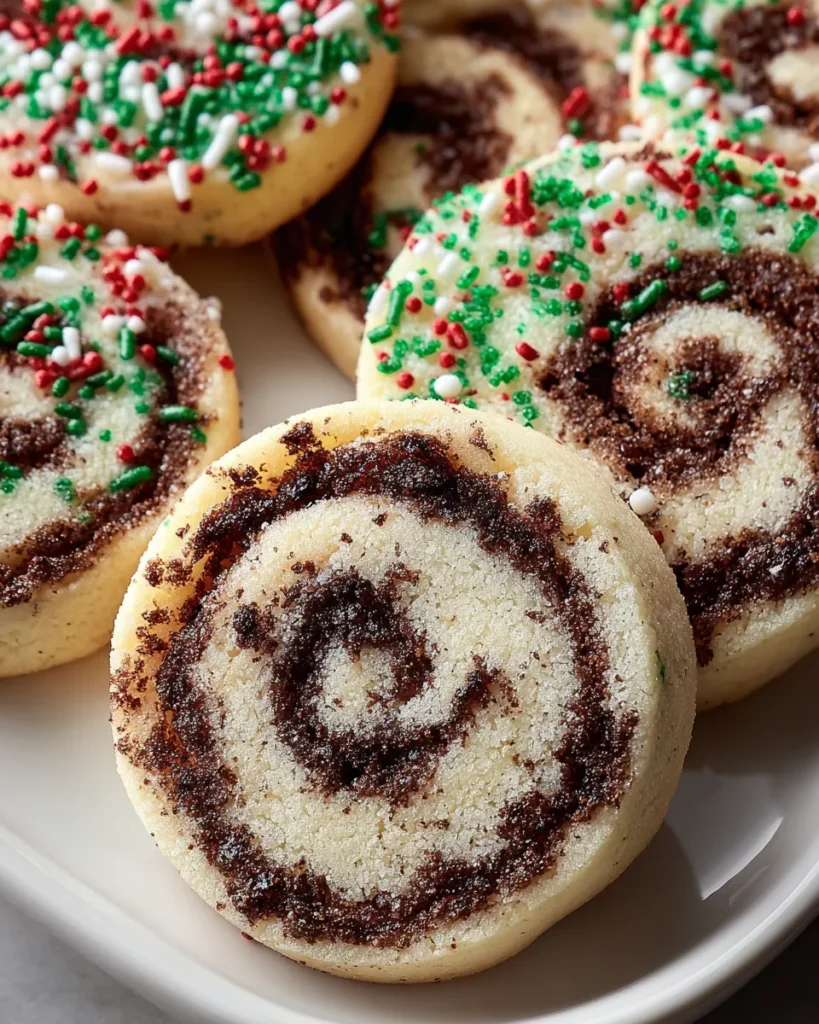
There’s something truly enchanting about unwrapping a chilled log of cookie dough and discovering the intricate swirls of chocolate and vanilla hidden within. With each slice, a new pattern emerges, promising buttery richness and the cozy warmth of rich cocoa in every bite. These Swirled Christmas Cookies are more than just a treat; they’re a festive work of art that brings a smile to every face around the holiday season. As you roll out the dough and layer these contrasting flavors, you’ll feel like a cookie artist painting with tastes instead of colors.
The beauty of these charming treats doesn’t end at their appearance. Celebrate the season with these delightful swirled Christmas cookies that are as beautiful as they are tasty! You’ll find yourself eagerly watching the oven window, waiting for those edges to turn a delicate golden hue. Once out, the aroma of vanilla and cocoa mingles in the air, promising a sweet escape from winter’s chill. Whether you’re gifting these beauties to neighbors, sharing them at a cookie exchange, or simply enjoying one (or three) with a cup of steaming hot chocolate, these cookies will fill your heart—and your home—with festive cheer.
Before diving into the fun of swirling and slicing, it’s important to understand how each ingredient plays a starring role. From the structure provided by flour to the flavor lift of extracts, each pantry staple comes together in harmony to create a tender, flavorful holiday cookie.
This pantry powerhouse forms the base of the dough, providing structure and tenderness. Its moderate protein content ensures each cookie holds its shape while remaining delightfully soft.
Acting as a gentle leavening agent, this ingredient gives the cookies a light lift, creating just enough puff so that the swirls remain distinct without losing their pattern.
A small amount of salt balances the sweetness and enhances all the other flavors, ensuring each bite is perfectly seasoned and never cloying.
Creamy and rich, butter contributes to the tender crumb and melt-in-your-mouth texture. Using it softened allows for easy creaming with the sugars.
This classic sweetener helps achieve the right level of sweetness and contributes to the desired spread, ensuring a tender edge around each swirl.
With its hint of molasses, brown sugar adds depth of flavor, moisture, and a slight chewiness that complements the tender vanilla dough.
The egg binds all the ingredients together, adding richness and helping the cookies hold their shape through baking and chilling.
Pure vanilla extract infuses each swirl with aromatic warmth and a familiar sweetness that pairs perfectly with chocolate.
Just a touch of almond extract adds a delicate, nutty fragrance that elevates the vanilla dough and brings a subtle complexity to the taste.
Unsweetened cocoa transforms half the dough into a rich chocolate variation, introducing deep chocolate notes that contrast beautifully with the vanilla base.
Dusting the finished log before rolling helps prevent sticking and makes slicing a breeze, while also adding a hint of sweetness to the look of the cookies.
Optional but festive, these sprinkles add a pop of color and a playful crunch to each cookie, perfect for holiday decorating.
Baking these cookies is like going on a festive little adventure, guiding you from mixing bowls to the magic of slicing perfect swirls. With clear steps and simple techniques, you’ll have a batch of 24 cookies ready to brighten any holiday spread.
1. Preheat your oven to 350°F (175°C) and line two baking sheets with parchment paper. This ensures even heat circulation and effortless cookie removal.
2. In a medium bowl, whisk together the all-purpose flour, baking powder, and salt. Combining these dry ingredients uniformly helps the cookies rise evenly and maintain their swirl patterns.
3. In a large mixing bowl, cream together the softened butter, granulated sugar, and brown sugar using an electric mixer on medium speed until the mixture is light, fluffy, and pale in color—about 2 to 3 minutes.
4. Add the egg, vanilla extract, and almond extract to the buttery mixture. Mix on low speed until everything is fully combined and the dough looks smooth and glossy.
5. Gradually incorporate the flour mixture into the wet ingredients. Keep your mixer on low speed and mix until you see just a few streaks of flour left—overmixing can lead to tougher cookies.
6. Divide the cookie dough in half. Leave one portion plain for the vanilla layer, and add the cocoa powder to the second portion. Mix with a sturdy spatula or mixer until the dough is uniformly chocolate in color.
7. Place a large sheet of parchment paper on your work surface. Roll out the plain dough into a neat rectangle, about ¼ inch thick, working from the center outward for even thickness.
8. Roll out the chocolate dough into another rectangle of the same size, ensuring both sheets are uniform for tidy slicing later.
9. Carefully layer the chocolate dough on top of the plain rectangle, aligning the edges. Starting from one short end, roll the dough tightly into a log shape, keeping the swirl pocket close.
10. Wrap the log securely in plastic wrap and refrigerate for about 2 hours, or until the dough feels firm to the touch. Chilling solidifies the shape for cleaner slices.
11. Once chilled, preheat the oven again if needed to maintain 350°F (175°C). Remove the log from the refrigerator and slice it into ¼-inch-thick rounds, using a sharp knife for clean edges.
12. Place each slice onto the prepared baking sheets, leaving about 1 inch of space between them to allow for slight spreading during baking.
13. If you’re feeling extra festive, sprinkle red and green sprinkles on top of each cookie before they go into the oven, pressing gently so they adhere.
14. Bake for 10–12 minutes, or until the edges are set and lightly golden. The centers should remain slightly soft, which helps preserve the tender crumb.
15. Remove the cookies from the oven and let them cool on the baking sheets for a few minutes. Then, carefully transfer each one to a wire rack to cool completely before serving.
After all the careful mixing, chilling, and baking, it’s time to share these gorgeous swirled cookies in style. Whether you’re planning a festive dessert board or a cozy night in, these serving suggestions will help your cookies shine and become the talk of every gathering.
Arrange the cookies on a decorative holiday platter with a few sprigs of fresh rosemary or holly for an elegant touch. The green and red sprinkles will pop against a white plate, making each swirl look even more inviting.
Serve alongside steaming hot cocoa or spiced eggnog in clear mugs. The warmth of the drink enhances the cookie’s buttery vanilla and rich chocolate flavors, creating a cozy contrast of textures and temperatures.
Layer the cookies in small bakery boxes or cello bags, placing parchment paper between layers to prevent sticking. Tie each box with festive ribbon and a personalized gift tag for a charming holiday giveaway.
Once the cookies are fully cooled, melt some white chocolate and drizzle it in thin ribbons across each swirl. Let it set on parchment paper, then transfer to a serving dish—this extra sweet accent adds a professional-looking finish.
Keeping your swirled Christmas cookies fresh and beautiful is easy with the right storage methods. Whether you’re baking ahead for a cookie swap or saving extras for later, these tips will help preserve flavor, texture, and that signature swirl.
Place cooled cookies in a single layer or with parchment paper between layers inside an airtight container. Store at room temperature for up to one week, ensuring they stay tender and maintain their swirl integrity.
If your kitchen is warm, store the airtight container in the refrigerator. Chilled cookies can last up to two weeks and will remain just as flavorful, though they may firm up slightly—just bring them to room temperature before serving.
Before slicing, wrap the cookie log tightly in plastic and place it in a freezer-safe bag. Freeze for up to three months, then slice and bake directly from frozen (adding a couple of extra minutes to the bake time).
Once baked and fully cooled, layer cookies between sheets of parchment inside a freezer-safe container. They’ll keep for up to two months—thaw at room temperature or gently warm them in a low oven for that freshly-baked feel.
Thank you for joining me on this delightful journey through the world of Swirled Christmas Cookies! We’ve explored every step from blending dry ingredients to mastering the perfect swirl and even considered creative ways to serve and store these charming holiday treats. With 30 minutes of active prep and a couple of hours of chilling, you’ll end up with 24 gorgeous cookies, each delivering around 120 calories of buttery vanilla and rich chocolate goodness. Feel free to print this article and save it in your holiday recipe binder—this guide is ready whenever you need it. You’ll also find a handy FAQ below to answer any lingering questions about techniques, substitutions, or troubleshooting—so you can bake with confidence.
I truly hope these cookies become a centerpiece of your festive celebrations and that you feel the warmth of the season with every bite. If you try this recipe, I’d love to hear how it turned out! Leave your comments, questions, or feedback below—whether you have a twist of your own, need help with baking times, or just want to share a holiday baking story, I’m here to chat and support your sweet endeavors. Happy baking and may your holidays be filled with delicious swirls and joyful moments!
These charming swirled cookies combine buttery vanilla and rich chocolate flavors, creating a festive treat that's perfect for holiday gatherings and cookie exchanges.

Hey there, kitchen adventurers! I'm Annie Parker, and welcome to my cozy corner of the internet where homestyle cooking meets creative twists, and every recipe is designed to make your life a little more delicious.