

Get ready to fill your kitchen with cozy spices and sweet citrus notes in every slice of this Festive Christmas Bread with Dried Fruit and Icing. Bursting with chewy cranberries, apricots, and crunchy nuts, this loaf is a warm hug on a chilly morning. The soft, spiced crumb topped with a glossy orange icing adds that perfect festive flourish. Gather your apron and let’s dive into this holiday treat, where every bite feels like a celebration and makes mornings (or anytime!) extra special.
Key Ingredients
Before we get started, make sure you’ve got all of these flavorful components on hand. Each item plays its part in creating a tender, spiced loaf studded with fruit and finished with a sweet citrus glaze.
- 4 cups all-purpose flour: Foundation for a soft, tender loaf with just the right structure.
- 1 packet (2 ¼ teaspoons) active dry yeast: Leavening agent that helps the bread rise and develop a light crumb.
- ½ cup granulated sugar: Sweetens the dough and balances the spices for a festive flavor.
- 1 teaspoon salt: Enhances all the flavors and strengthens the gluten in the dough.
- 1 teaspoon ground cinnamon: Warm spice that infuses each bite with holiday cheer.
- ½ teaspoon ground nutmeg: Adds a nutty, aromatic depth to complement the cinnamon.
- ½ cup milk, warmed: Provides moisture and creates a tender, rich dough.
- ½ cup unsalted butter, melted: Brings richness and keeps the crumb soft.
- 3 large eggs, room temperature: Bind ingredients and give structure, richness, and moisture.
- 1 cup mixed dried fruit (such as cranberries, apricots, and raisins): Chewy bursts of sweetness and tartness throughout the loaf.
- ½ cup chopped nuts (such as walnuts or pecans): Crunchy texture and nutty flavor contrast the soft crumb.
- 1 teaspoon vanilla extract: Adds floral, sweet warmth that enhances the fruit.
- 1 cup powdered sugar: Base for the orange icing that dresses the loaf with a sweet finish.
- 1–2 tablespoons milk (for icing): Thins the powdered sugar into a smooth drizzle consistency.
- Zest of 1 orange: Bright citrus flavor that livens up the icing and dough.
How To Make Festive Christmas Bread with Dried Fruit and Icing
Baking this loaf is a joyful process that blends warm spices, sweet fruit, and nurturing techniques to deliver a golden, aromatic centerpiece. You’ll combine dry ingredients, whisk together wet ingredients, and then bring everything together into a sticky dough. Gentle kneading develops the gluten, while two rises ensure a light, airy crumb. Finally, you’ll bake to a perfect golden hue and finish with a simple orange icing drizzle to create that classic festive look.
1. In a large mixing bowl, combine 2 cups of flour, active dry yeast, granulated sugar, salt, ground cinnamon, and ground nutmeg. Stir well to ensure the yeast is evenly distributed among the dry ingredients.
2. In a separate bowl, whisk together warmed milk, melted butter, and eggs until smooth. Stir in vanilla extract and orange zest for a bright citrus note.
3. Pour the wet ingredients into the dry mixture and stir together until just combined, being careful not to overmix.
4. Gradually add the remaining flour, ½ cup at a time, mixing with a wooden spoon until a sticky dough forms.
5. Turn the dough out onto a floured surface. Knead for about 8–10 minutes until it becomes smooth and elastic, adding a dusting of flour only if needed.
6. In the last few minutes of kneading, fold in mixed dried fruit and chopped nuts, ensuring they’re evenly distributed throughout the dough.
7. Place the kneaded dough into a greased bowl, cover with a clean kitchen towel, and let it rise in a warm, draft-free place for 1–2 hours or until doubled in size.
8. Preheat your oven to 350°F (175°C). Once the dough has risen, punch it down gently to release excess air.
9. Shape the dough into a single loaf or divide it into two smaller loaves, placing them into greased loaf pans.
10. Allow the loaves to rise again, uncovered, for an additional 30–40 minutes until slightly puffy.
11. Bake in the preheated oven for 30–35 minutes, or until the crust turns golden brown and a toothpick inserted into the center comes out clean.
12. Remove the bread from the oven and let it cool in the pans for about 15 minutes before transferring to a wire rack to cool completely.
13. For the icing, mix powdered sugar with 1–2 tablespoons of milk until you achieve a smooth, drizzle consistency. Adjust with more milk or sugar as needed.
14. Once the bread has cooled, drizzle the orange icing over the top and allow it to set before slicing and serving.
Serving Suggestions
This spiced, fruit-filled bread is incredibly versatile and shines in many serving situations. Whether you’re entertaining guests on a festive morning, craving a sweet afternoon pick-me-up, or seeking a charming edible gift, this loaf effortlessly adapts. Each slice brings warmth and cheer, pairing beautifully with coffee, tea, or even a dollop of whipped cream. Don’t forget to garnish with extra orange zest or a sprinkle of cinnamon for a professional finish.
- Breakfast spread: Serve thick slices with a smear of butter and your favorite jam for a cozy holiday morning.
- Afternoon tea: Pair with a cup of spiced chai or Earl Grey to balance the loaf’s sweetness.
- Festive gift: Wrap individual slices in cellophane and tie with a ribbon for a thoughtful homemade present.
- Dessert finale: Top warm slices with vanilla ice cream or whipped cream for a simple, crowd-pleasing treat.
Tips For Perfect Festive Christmas Bread with Dried Fruit and Icing
Every bake comes with its own little secrets, and this Christmas bread is no exception. To nail that soft, airy crumb and dazzling orange icing, keep a few tricks in your back pocket. Timing, temperature, and ingredient tweaks can make all the difference between a good loaf and an unforgettable one. Whether you’re a seasoned baker fine-tuning your enriched dough skills or a first-timer eager to impress, these practical pointers will guide you through the entire process. You’ll learn how to manage proofing times in a chilly kitchen, explore flavor swaps that suit your taste, and present your loaf in festive style. Follow these notes, and you’ll wow every guest with minimal fuss and maximum cheer.
- This bread can be made a day in advance and tastes even better after resting.
- Feel free to customize the dried fruit and nuts based on your taste preferences.
- Adding a hint of almond extract along with the vanilla can give an additional flavor boost.
- This bread makes a great gift when wrapped in festive packaging!
How To Store It
To enjoy your Festive Christmas Bread’s soft crumb and zesty icing days after baking, proper storage is key. Whether you plan to savor it over several breakfasts or share it as a gift, these methods will help maintain freshness, moisture, and flavor. Avoid stale slices and dry edges by wrapping correctly, controlling humidity, and portioning for convenience.
- Room Temperature Storage: Once cooled, wrap the loaf tightly in plastic wrap or place it in an airtight container. Store at room temperature for up to 3–4 days.
- Refrigeration: For extra longevity, wrap in plastic and place in the fridge. The bread will stay moist for up to one week but may firm up slightly—simply warm slices before serving.
- Freezing: Slice the loaf, then wrap individual portions in plastic wrap and seal in a freezer bag. Freeze for up to one month and thaw at room temperature or toast directly from frozen.
- Pre-sliced Freezer Pack: If you love convenience, pre-slice the bread before freezing so you can grab exactly the number of slices you need without thawing the whole loaf.
Frequently Asked Questions
Got questions? Let’s clear up common queries so your festive baking goes off without a hitch!
- Can I substitute the dried fruit and nuts with other varieties?
Yes. You can swap the mixed dried fruit for cherries, figs, or golden raisins, and replace walnuts or pecans with almonds or hazelnuts. Just ensure you use a total of 1 cup of dried fruit and ½ cup of nuts to maintain the dough’s hydration and texture.
- How do I know when the first rise is complete?
The dough is ready when it has doubled in size and holds an indentation when gently pressed with your fingertip. This typically takes 1–2 hours in a warm, draft-free environment. If your kitchen is cool, allow up to 2½ hours.
- My dough is too sticky to knead. What should I do?
Lightly flour your work surface and hands, but avoid adding too much flour, which can make the bread dense. If the dough remains excessively sticky, let it rest for 5–10 minutes; the gluten will relax and the dough will be easier to handle.
- Can I make the dough the night before?
Yes. After the first knead, place the covered bowl in the refrigerator overnight. The cold ferment will deepen the flavor. Bring dough to room temperature before shaping and allow for the usual second rise (30–40 minutes) before baking.
- How should I store the baked bread, and how long will it stay fresh?
Once completely cooled, wrap the loaf tightly in plastic wrap or place it in an airtight container. It will keep at room temperature for 3–4 days. For longer storage, freeze slices in a resealable bag for up to one month; thaw at room temperature or toast directly from frozen.
- What’s the best way to achieve a smooth, drizzle-able icing?
Start with 1 tablespoon of milk mixed into the powdered sugar. Stir until smooth, then add more milk drop by drop until you reach a pourable consistency that holds its shape briefly on the bread. Too much milk will make it runny; add extra sugar to thicken if needed.
- How can I tell when the bread is fully baked?
The crust should be golden brown, and an instant-read thermometer inserted into the center should read about 190°F (88°C). Alternatively, tap the bottom of the loaf—if it sounds hollow, the bread is done.
- Is it possible to make this recipe gluten-free?
You can substitute a 1-to-1 gluten-free flour blend that includes xanthan gum. Dough will be stickier, so increase mixing time rather than adding more flour. Expect a slightly denser texture and ensure a thorough bake by checking for the hollow tap sound.
What Makes This Special
This Festive Christmas Bread ticks all the holiday boxes: warm spices, chewy fruit, crunchy nuts, and a tangy-sweet orange icing that glows like a Christmas tree. The secret lies in the tender, enriched dough, the perfect balance of cinnamon and nutmeg, and that final drizzle that brings it all together. It’s a fun project to bake with friends or family, and the flavors deepen if you let it rest. Feel free to print this recipe, tuck it into your holiday binder, and revisit it year after year. If you try it out or have any questions, leave a comment—I’d love to hear how your loaf turned out or help troubleshoot your dough!
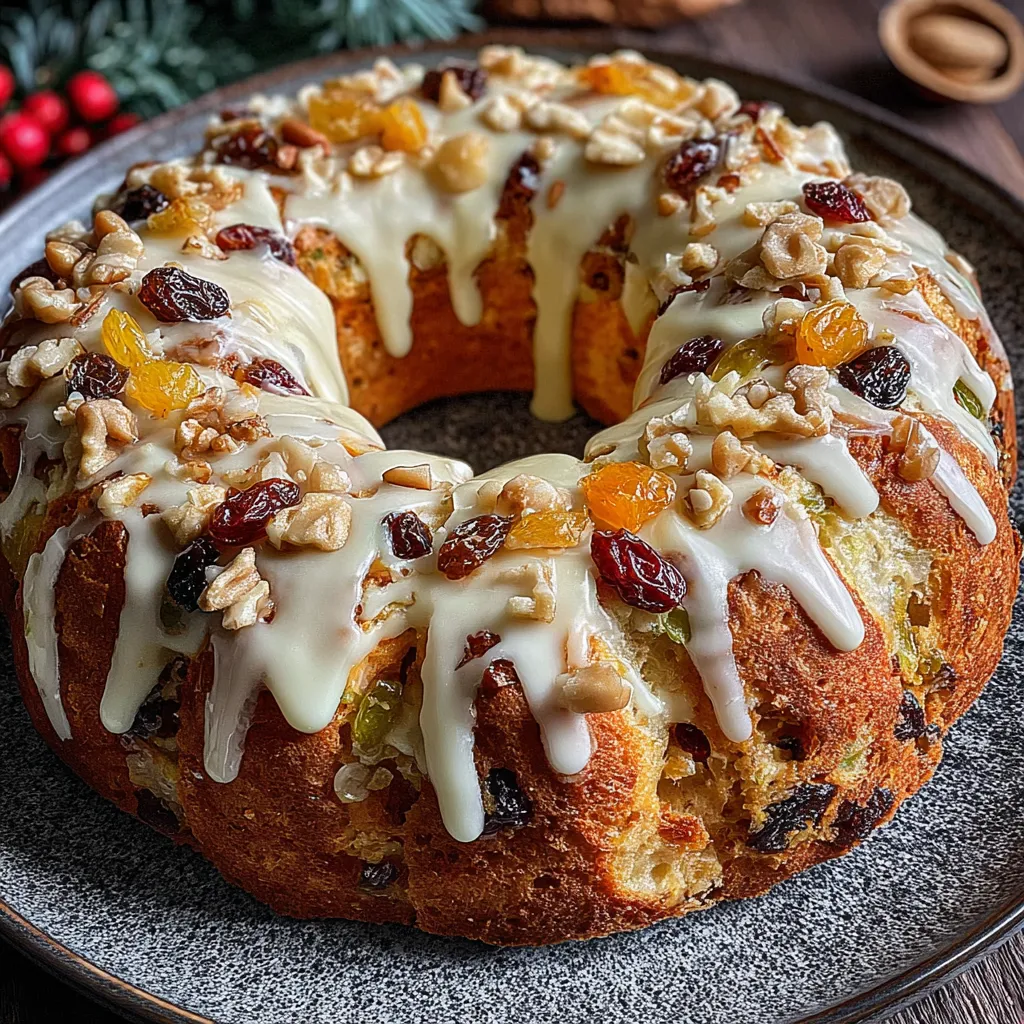

Festive Christmas Bread with Dried Fruit and Icing
Description
Warm slices release citrusy aroma, mingling cinnamon and nutmeg with bursts of dried cranberries and nuts. Soft crumb is kissed by glossy vanilla-orange icing for a festive finish.
Ingredients
Instructions
-
In a large mixing bowl, combine 2 cups of flour, yeast, granulated sugar, salt, cinnamon, and nutmeg. Mix well to combine.
-
In a separate bowl, whisk together the warmed milk, melted butter, and eggs until smooth. Add the vanilla extract and orange zest, then mix again.
-
Pour the wet ingredients into the dry mixture and stir together until just combined.
-
Gradually add the remaining flour, ½ cup at a time, mixing with a wooden spoon until a sticky dough forms.
-
Once the dough starts to come together, turn it out onto a floured surface. Knead the dough for about 8-10 minutes until it becomes smooth and elastic.
-
In the last few minutes of kneading, add the mixed dried fruit and chopped nuts, making sure they are evenly distributed throughout the dough.
-
Place the kneaded dough into a greased bowl, cover with a clean kitchen towel, and let it rise in a warm place for about 1-2 hours or until doubled in size.
-
Preheat your oven to 350°F (175°C). Once the dough has risen, punch it down gently to release air.
-
Shape the dough into a loaf or divide it into two smaller loaves and place them into greased loaf pans.
-
Allow the loaves to rise again, uncovered, for an additional 30-40 minutes until slightly puffy.
-
Bake the bread in the preheated oven for 30-35 minutes, or until golden brown and a toothpick inserted comes out clean.
-
Remove the bread from the oven and let it cool in the pans for about 15 minutes before transferring them to a wire rack to cool completely.
-
For the icing, mix the powdered sugar with 1-2 tablespoons of milk until you achieve a drizzle consistency. Adjust with more milk or sugar as necessary.
-
Once the bread has cooled, drizzle the icing over the top and allow it to set before slicing and serving.
Note
- This bread can be made a day in advance and tastes even better after resting.
- Feel free to customize the dried fruit and nuts based on your taste preferences.
- Adding a hint of almond extract along with the vanilla can give an additional flavor boost.
- This bread makes a great gift when wrapped in festive packaging!

