

The Thai Peanut Chicken Wrap is a lunch superstar that brings together creamy peanut sauce, zesty lime juice, and a hint of fresh ginger—all rolled up with tender shredded chicken and crisp veggies in a soft tortilla. Whether you’re feeding a hungry crowd or need a quick solo meal, this Beginner-friendly wrap delivers nutty, citrusy, and crunchy textures in every bite. Give it a try and you’ll see why it’s destined to become a regular in your recipe rotation!
Key Ingredients
Gather these simple ingredients to build your Thai Peanut Chicken Wrap with flavor and texture in every bite:
- 2 cups cooked shredded chicken: Tender protein coated in creamy peanut sauce for maximum flavor.
- 4 tortillas: Soft wraps that hold the peanut chicken mixture and crunchy veggies together.
- 1/2 cup creamy peanut butter: Rich, velvety base for the signature Thai peanut sauce.
- 1/4 cup soy sauce: Savory, umami depth to balance the sweetness of peanut butter.
- 2 tablespoons lime juice: Zesty citrus notes brighten the sauce and cut through richness.
- 1 tablespoon honey: Natural sweetness to round out the flavors.
- 1 teaspoon grated fresh ginger: Warm, spicy aroma that complements the nutty sauce.
- 1 clove garlic, minced: Sharp, aromatic bite to enhance complexity.
- 1 tablespoon vegetable oil: Used to gently warm tortillas without drying them out.
- 1 cup shredded cabbage: Crunchy layer that brings freshness and texture.
- 1/2 cup shredded carrots: Sweet, crisp strands that add color and body.
- 1/4 cup chopped fresh cilantro: Herbaceous lift to the overall flavor profile.
- 1/4 cup chopped peanuts: Extra crunch and nutty garnish to finish each wrap.
How To Make Thai Peanut Chicken Wrap
Ready to roll? These step-by-step instructions will guide you through whisking up the sauce, coating the chicken, gently warming the tortillas, and perfectly assembling each wrap for a satisfying bite every time. Follow along for an easy process that turns simple ingredients into a flavor-packed meal.
1. In a bowl, whisk together the peanut butter, soy sauce, lime juice, honey, grated ginger, and minced garlic until the mixture is silky smooth and well combined.
2. Toss the cooked shredded chicken with the peanut sauce, ensuring every strand of chicken is fully coated in creamy, tangy goodness.
3. Heat the vegetable oil in a skillet over medium heat. Warm each tortilla for about 30 seconds per side until pliable with light golden spots.
4. Lay the warmed tortillas flat on a clean surface and divide the peanut-coated chicken evenly among them.
5. Top each wrap with shredded cabbage, shredded carrots, chopped cilantro, and chopped peanuts for a refreshing crunch.
6. Roll the tortillas tightly around the filling, slice each wrap in half on the diagonal, and serve immediately for the best texture.
Serving Suggestions
These vibrant wraps shine on their own, but a few simple sides and accompaniments can elevate your meal even further. Here are some fun ideas to round out your Thai-inspired feast:
- Serve with fresh lime wedges on the side to squeeze over the wraps for an extra burst of citrus brightness.
- Pair with a quick cucumber salad dressed in rice vinegar and sesame oil to complement the wrap’s rich, nutty flavors.
- Offer a small bowl of extra peanut sauce or sriracha for dipping, letting everyone customize the heat level.
- Accompany with steamed edamame sprinkled with sea salt for a light, protein-packed side that balances the meal.
Tips For Perfect Thai Peanut Chicken Wrap
These friendly tips will help you nail every aspect of the recipe, from tweaking the spice to keeping everything fresh and delicious. With just a few tweaks, you can customize the wrap to your taste and dietary needs—no guesswork required!
- For a spicier kick, add sriracha or chili flakes to the peanut sauce.
- Use gluten-free tortillas and tamari for a gluten-free version.
- Leftover sauce can be stored in the refrigerator for up to a week.
- Serve with lime wedges for extra freshness.
How To Store It
Keeping your components fresh and ready to assemble ensures a quick lunch or dinner on busy days. Whether you store the sauce, chicken, or veggies, these tips will help maintain ideal texture and flavor.
- Store the peanut sauce in an airtight container or jar and refrigerate for up to 7 days.
- Keep shredded chicken separate in a sealed container and refrigerate for 2–3 days.
- Save veggies and tortillas by storing shredded cabbage, carrots, cilantro, and wraps in labeled containers in the fridge for up to 2 days.
- Reheat chicken in a skillet over medium heat until warmed through, then assemble fresh wraps to preserve crisp textures.
Frequently Asked Questions
Got questions? I’ve got answers to ensure your Thai Peanut Chicken Wrap turns out perfectly every time!
- How do I achieve a smooth, well-blended peanut sauce?
Start with creamy peanut butter at room temperature, then add soy sauce, lime juice, honey, ginger, and garlic gradually while whisking. If the mixture is too thick to whisk easily, add a teaspoon of warm water at a time until it reaches a pourable yet still creamy consistency.
- How can I adjust the spice level in the Thai Peanut Chicken Wrap?
To introduce heat, stir sriracha or chili flakes into the peanut sauce a little at a time, tasting as you go. If you prefer milder heat, add just a dash; for a more intense kick, increase to one or two teaspoons.
- What’s the best method for warming tortillas without drying them out?
Heat a lightly oiled skillet over medium heat and warm each tortilla for about 30 seconds per side. This seals in moisture and adds a slight crispness. Alternatively, wrap the stack of tortillas in a damp paper towel and microwave for 20–30 seconds to keep them soft and pliable.
- How can I make this recipe gluten-free?
Swap regular tortillas for gluten-free tortillas and use tamari or a certified gluten-free soy sauce in place of standard soy sauce. All other ingredients—peanut butter, lime juice, honey, ginger, garlic, vegetables, and chicken—are naturally gluten-free.
- Can any components be prepared ahead of time to save time on assembly day?
Yes. You can shred cooked chicken and whisk up the peanut sauce up to 2 days in advance—store both in airtight containers in the refrigerator. Keep shredded cabbage, carrots, cilantro, and chopped peanuts in separate containers. Warm tortillas and assemble just before serving for maximum freshness.
- How should I store leftovers and what’s the best way to reheat them?
Leftover peanut sauce will keep in the refrigerator for up to one week in a sealed jar or container. If you have assembled wraps, store them tightly wrapped in plastic or foil for up to 24 hours; they may become slightly soggy. For best results, store chicken and vegetables separately and reheat the chicken in a skillet over medium heat until warmed through, then assemble fresh.
- My peanut sauce turned out too thick or too thin—how do I fix it?
If the sauce is too thick, whisk in warm water or additional lime juice, one teaspoon at a time, until you reach your desired consistency. If it’s too thin, gradually stir in a bit more peanut butter, allowing it to fully incorporate before adding more, until it coats the chicken evenly.
What Makes This Special
This Thai Peanut Chicken Wrap stands out for its incredible balance of creamy, tangy, and crunchy elements—all ready in under 20 minutes for a fuss-free lunch or light dinner. It’s perfect for customizing with extra heat or gluten-free swaps, and it’s so easy you’ll want to print and save this recipe for rainy days or last-minute meal plans. If you give it a whirl, drop a comment below—share your tweaks, ask questions, or let me know how it turned out!
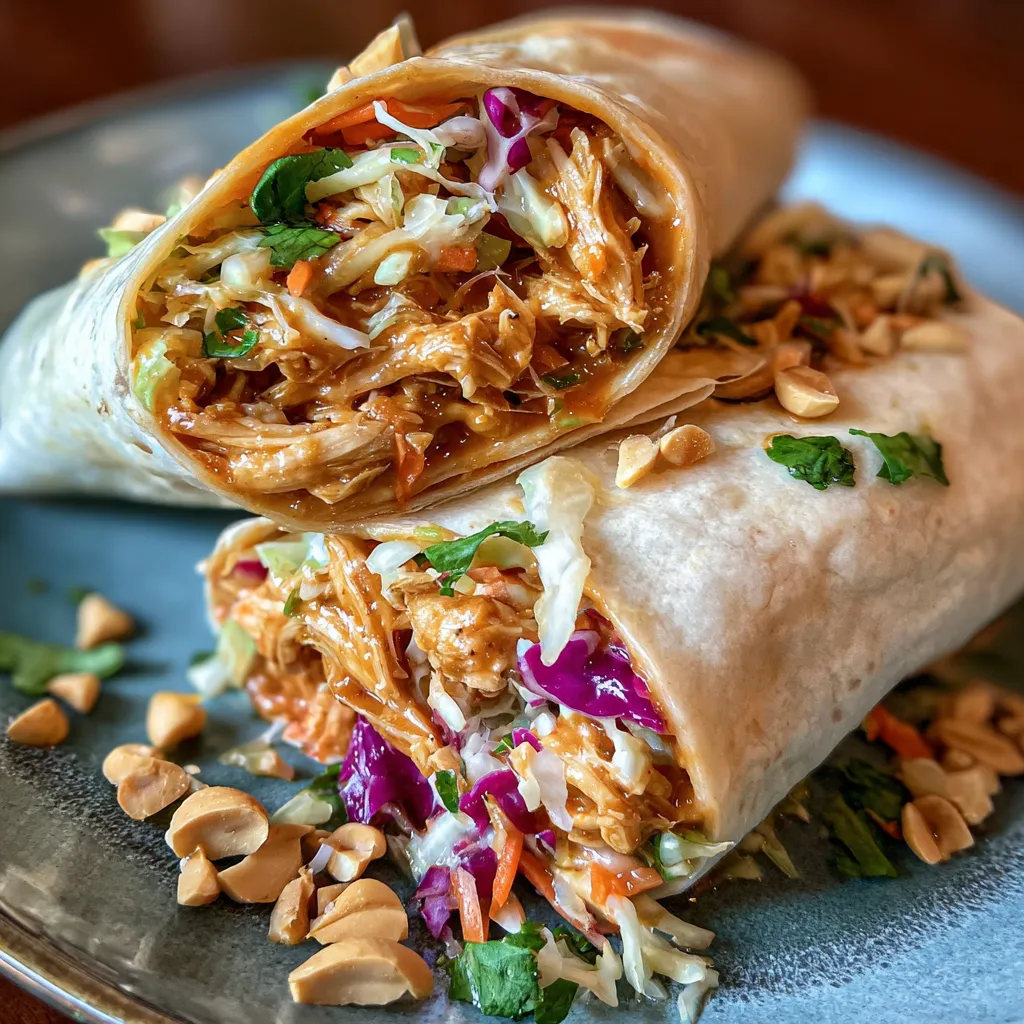

Thai Peanut Chicken Wrap
Description
Creamy peanut sauce mingles with zesty lime juice and grated ginger, enveloping tender chicken and crisp cabbage in a warm tortilla. Each bite offers a harmony of nutty, citrusy, and crunchy textures.
Ingredients
Instructions
-
In a bowl whisk together peanut butter, soy sauce, lime juice, honey, ginger, and garlic until smooth.
-
Toss shredded chicken with the peanut sauce until evenly coated.
-
Heat vegetable oil in a skillet over medium heat and warm tortillas for about 30 seconds on each side.
-
Lay tortillas flat and divide peanut chicken mixture among them.
-
Top each wrap with shredded cabbage, carrots, cilantro, and chopped peanuts.
-
Roll tortillas tightly around the filling, slice in half, and serve.
Note
- For a spicier kick, add sriracha or chili flakes to the peanut sauce.
- Use gluten-free tortillas and tamari for a gluten-free version.
- Leftover sauce can be stored in the refrigerator for up to a week.
- Serve with lime wedges for extra freshness.

