

Get ready to dive into a dessert that feels like a cozy hug on a plate. Brownie Refrigerator Cake is the kind of sweet treat that makes you believe magic and chocolate really do go hand in hand. This layered wonder features a fudgy brownie base topped with a velvety cheesecake spread and finished with a cloud of whipped cocoa cream. Whether you’re slicing into it on a warm afternoon or serving it at a holiday gathering, each bite delivers a delightful contrast of textures—dense, silky, and airy—all dancing together in perfect harmony.
Beyond its irresistible taste, this recipe is a celebration of simplicity meeting indulgence. You’ll find yourself whisking, spreading, and layering without breaking a sweat, thanks to easy-to-follow steps and pantry-friendly ingredients. It’s beginner-friendly, yet the result feels like you spent hours perfecting every layer. From that moment when the brownie comes out of the oven to its final chill in the fridge, it’s a joyful process that fills your kitchen with anticipation. Soon enough, you’ll be the envy of every dessert lover in your life, armed with a cake that melts in your mouth and makes any occasion instantly festive.
KEY INGREDIENTS IN BROWNIE REFRIGERATOR CAKE
Before you roll up your sleeves, let’s talk about what makes this cake so special. Each ingredient brings its own personality to the party, combining ease with elegance. Grab these staples, and you’re on your way to creating a dessert that’s as simple as it is stunning.
- Brownie mix
A convenient shortcut to a fudgy, chocolatey base. It saves time while delivering a rich foundation that bakes into a tender, chewy layer.
- Water
Helps hydrate the brownie mix, ensuring the batter reaches the perfect consistency for a moist bake without any dry spots.
- Vegetable oil
Keeps the brownies ultra-moist and tender. You can swap in melted butter for a richer flavor if you’d like to pamper your taste buds even more.
- Eggs
Act as a binding agent, adding structure and lift so the brownies bake up with a satisfyingly dense crumb.
- Cream cheese
Provides a creamy, tangy layer that contrasts beautifully with the intense chocolate. Be sure to use it at room temperature for the smoothest texture.
- Powdered sugar
Sweetens and stabilizes the cheesecake layer, dissolving easily to create a silky finish without any graininess.
- Vanilla extract
Offers a warm, aromatic lift that highlights the cheesecake’s creaminess and balances out the chocolate notes.
- Heavy whipping cream
Whips into airy peaks that lend the dessert a light, almost feather-like top layer, keeping the overall feel from becoming too dense.
- Cocoa powder
Infuses extra chocolate intensity into the whipped cream, creating a luscious, velvety topping that’s not overly sweet.
- Granulated sugar
Stabilizes the whipped cream and adds a touch of sweetness. It also helps maintain those perfect stiff peaks.
- Chocolate chips or shavings
A finishing flourish that adds texture and extra bursts of chocolate, making each slice look as beautiful as it tastes.
HOW TO MAKE BROWNIE REFRIGERATOR CAKE
Get ready to assemble this layered delight step by step. From baking to chilling, every stage is straightforward and rewarding, so let’s walk through the process together.
1. Preheat your oven to the temperature specified on the brownie mix package. This ensures an even bake and that perfect fudgy texture.
2. In a large mixing bowl, combine the brownie mix, water, vegetable oil, and eggs. Stir until the batter is smooth and free of lumps, taking care to scrape down the sides for a uniform mix.
3. Grease a baking pan with butter or non-stick spray. Pour the brownie batter in and spread it evenly with a spatula, making sure the corners are filled.
4. Bake the brownies according to the package instructions. Once golden at the edges and set in the center, remove from the oven and place on a wire rack to cool completely—this prevents the layers from merging.
5. In a separate bowl, beat the cream cheese until it’s luxuriously smooth. Add the powdered sugar and vanilla extract, then beat again until everything is fully incorporated.
6. In another chilled bowl, whip the heavy whipping cream until soft peaks form. Gradually sift in the cocoa powder and granulated sugar, then continue whipping until stiff peaks appear.
7. Once the brownies have cooled, spread the cream cheese mixture evenly over the top using an offset spatula for a seamless finish.
8. Gently spread the whipped cocoa cream over the cheesecake layer, taking care to keep the surface smooth and even.
9. Cover the entire cake with plastic wrap and refrigerate for at least 2 hours, allowing the layers to set firmly and flavors to meld.
10. Before serving, sprinkle the top with chocolate chips or shavings for a delightful, textural garnish.
SERVING SUGGESTIONS FOR BROWNIE REFRIGERATOR CAKE
After waiting patiently for the cake to set, it’s time to think about presentation and pairing. How you serve your Brownie Refrigerator Cake can turn everyday moments into memorable celebrations. Consider these ideas to wow your guests or simply treat yourself to a café-quality experience at home.
- Neat Squares
Use a sharp, hot knife (dip in warm water, then dry) to slice precise squares. This method showcases each layer distinctly and keeps your presentation looking clean and professional.
- Fresh Berry Accompaniment
Arrange a handful of juicy raspberries or strawberries on the side. Their natural tartness adds a bright contrast to the rich chocolate and creamy layers.
- Mint Leaf Garnish
Top each slice with a small sprig of fresh mint. The hint of herbal freshness cuts through the sweetness, making every bite feel lighter.
- Elegant Dessert Platter
Display slices on a decorative platter with a dusting of cocoa powder or a drizzle of melted chocolate. Layer with doilies or parchment for an Instagram-worthy finish.
HOW TO STORE BROWNIE REFRIGERATOR CAKE
Proper storage ensures your cake remains as delightful days after assembly as it was on day one. These tips will help maintain its moistness, flavor, and structural integrity so you can savor every layer just as intended.
When you’re ready to stash leftovers, place the cake in an airtight container or cover the serving dish tightly with plastic wrap. This prevents the whipped layers from absorbing fridge odors and keeps the top from drying out. If you’re worried about moisture, tuck a piece of parchment between the wrap and the cream to preserve the texture.
- Refrigerate
Store in the fridge for up to 4 days. Keep it on a lower shelf away from strong-smelling foods to avoid flavor transfer.
- Freeze
For longer storage, slice the cake into portions, wrap each piece tightly with plastic wrap, then a layer of foil. Freeze for up to one month, thawing in the fridge before serving.
- Layer Protection
If placing in a container, line the bottom with parchment paper and separate layers with additional sheets to stop them from sticking.
- Short-Term Display
If you’ll be enjoying the cake within a few hours, allow it to sit at room temperature (covered) for up to 30 minutes before serving to soften the whipped cream just slightly.
CONCLUSION
What a journey we’ve been on, from whisking that first brownie batter to slicing into perfectly chilled layers of chocolatey, creamy bliss. This Brownie Refrigerator Cake is proof that you don’t need complicated steps or hard-to-find ingredients to create something truly show-stopping. With a fudgy brownie base, a tangy cheesecake middle, and an airy cocoa whipped cream crown, every forkful is a delightful symphony of textures and flavors. Whether you’re marking a special occasion or simply craving a decadent finish to your day, this recipe is your ticket to dessert heaven.
Feel free to print and save this article for your recipe box—it’s a keeper you’ll want to revisit again and again. Don’t forget to check out the FAQ below if you have any questions about swaps or troubleshooting. And if you give this cake a try, I’d love to hear how it turned out! Leave your comments, questions, or feedback so we can keep the conversation going. Happy baking and chilling!
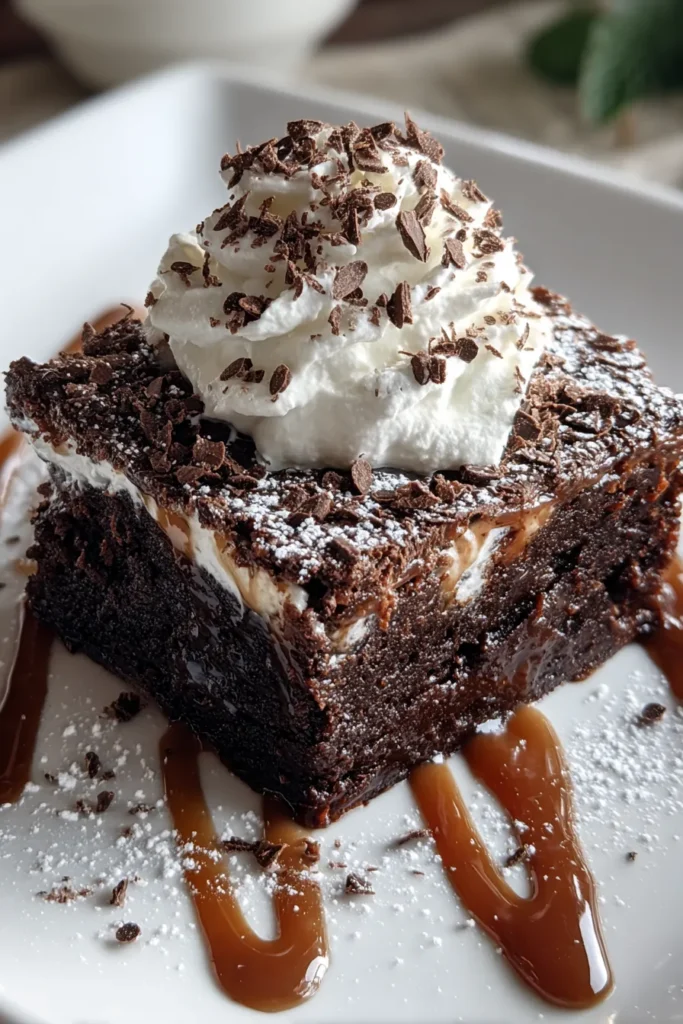

Brownie Refrigerator Cake
Description
Experience layers of rich brownie, creamy cheesecake, and luscious whipped cocoa cream in this refreshing dessert that’s perfect for any occasion.
Ingredients
Instructions
-
Preheat your oven to the temperature specified on the brownie mix package.
-
In a large mixing bowl, combine the brownie mix, water, vegetable oil, and eggs. Stir until the mixture is smooth and well combined.
-
Pour the brownie batter into a greased baking pan and spread evenly.
-
Bake the brownies according to the package instructions. Once baked, remove from the oven and allow them to cool completely on a wire rack.
-
In a separate bowl, beat the cream cheese until smooth. Then add the powdered sugar and vanilla extract, beating until well combined.
-
In another bowl, whip the heavy whipping cream until soft peaks form. Gradually add the cocoa powder and granulated sugar, whisking until stiff peaks form.
-
Once the brownies have cooled, spread the cream cheese mixture evenly over the brownies.
-
Gently spread the whipped cocoa cream on top of the cream cheese layer.
-
Cover the cake with plastic wrap and refrigerate for at least 2 hours, or until it is firmly set.
-
Before serving, sprinkle the top with chocolate chips or shavings for adornment.
Note
- Allow brownies to cool completely before adding layers to prevent melting and mixing.
- For a richer flavor, replace vegetable oil with melted butter.
- Enhance the chocolate flavor by adding espresso powder to the brownie batter.
- For garnish, you can add nuts or crushed cookies on top.
- Refrigerating helps enhance the flavors and improve the texture.
- To ensure smooth layers, use a spatula or knife dipped in hot water.

