

The holiday season just wouldn’t be complete without a tray of chewy, colorful Christmas cookie bars taking center stage on your dessert table. With each bite, you’ll experience a buttery, tender base studded with sweet white chocolate chips and vibrant red and green M&M’s that pop against the golden dough. The sugary crunch of the candies and optional chopped nuts adds a delightful texture contrast, while hints of vanilla and brown sugar swirl through each square, making your kitchen smell like a festive wonderland. These bars aren’t just easy to bake; they’re downright irresistible, perfect for busy home cooks who want maximum flavor with a minimum of fuss.
Whether you’re wrapping up a day of shopping or gathering around the tree for carols, these Christmas cookie bars bring people together. They’re simple enough for beginner bakers but impressive enough to steal the show at any holiday party. From drizzling melted chocolate on top to sprinkling extra candy pieces for a festive flourish, you can customize them to match your merry mood. Grab your favorite mixing bowl and get ready to spread joy, one chewy, colorful square at a time. These bars are more than a treat—they’re a sweet memory waiting to happen.
KEY INGREDIENTS IN CHRISTMAS COOKIE BARS
Before we dive into the baking fun, let’s talk about the key players that make these Christmas cookie bars so spectacular. Each ingredient works together to create the perfect balance of chewiness, sweetness, and festive flair. From the foundation of flour to the spark of holiday-themed candies, here’s what you need:
- All-purpose flour
Provides the sturdy backbone for the bars, delivering structure and that tender crumb we love. It’s the flour that helps everything stick together without feeling too dense.
- Baking soda
Acts as a leavening agent, ensuring the dough rises just enough to stay soft and chewy rather than cakey. It also helps the edges develop a light golden hue.
- Salt
A little pinch of salt amplifies the sweetness of the sugars and chocolate while balancing flavors. It’s a small addition that makes a big difference in depth.
- Unsalted butter
Offers rich, creamy flavor and contributes to the moist texture. When softened and creamed with sugars, it creates pockets of air that lead to a fluffy, tender bite.
- Granulated sugar
Adds sweetness and helps the bars spread evenly while baking, giving them a slightly crisp edge and soft center.
- Brown sugar
Introduces moistness and a hint of caramel flavor, enhancing chewiness and deepening the overall taste profile.
- Large eggs
Provide binding structure and moisture, making sure each bar holds together perfectly when sliced. They also contribute to the tender texture.
- Vanilla extract
Infuses warm, aromatic notes that complement the chocolate and candy, giving the dough a cozy holiday scent.
- White chocolate chips
Melt into sweet, creamy pockets throughout the bars, offering bursts of smooth decadence in every mouthful.
- Holiday-themed chocolate candies
Bring vibrant red and green color, crunchy texture, and an extra chocolate hit that screams festive fun.
- Chopped nuts (optional)
Add a satisfying crunch and nutty flavor contrast, boosting the overall texture if you’re a fan of a little extra bite.
HOW TO MAKE CHRISTMAS COOKIE BARS
Baking these Christmas cookie bars is a breeze once you have your ingredients prepped and ready. You’ll be whisking, creaming, folding, and popping the pan into the oven in no time. Follow these steps carefully and keep an eye on your oven to achieve that perfect balance of golden edges and a soft, tender center.
1. Preheat your oven to 350°F (175°C). Grease a 9×13-inch baking dish or line it with parchment paper for easy removal and minimal sticking.
2. In a medium bowl, whisk together the all-purpose flour, baking soda, and salt until evenly combined. This ensures your bars rise evenly and have a consistent crumb. Set this dry mix aside.
3. In a large mixing bowl, use an electric mixer to cream together the softened butter, granulated sugar, and brown sugar. Beat until the mixture is light, fluffy, and pale in color, about 3 to 4 minutes, scraping down the sides as needed.
4. Add the eggs, one at a time, to the butter-sugar mixture, mixing well after each addition. Stir in the vanilla extract until the batter is smooth and glossy.
5. Gradually add the dry ingredients to the wet ingredients, mixing on low speed or stirring with a spatula just until combined. Overmixing can develop too much gluten, making the bars tough.
6. Fold in the white chocolate chips, holiday-themed M&M’s, and chopped nuts (if using), distributing them evenly throughout the dough without crushing the candies.
7. Transfer the cookie bar dough to the prepared baking dish and spread it out in an even layer using a spatula or lightly greased hands. Aim for a uniform thickness for even baking.
8. Bake in your preheated oven for 25–30 minutes, or until the edges are lightly golden and a toothpick inserted into the center comes out clean or with just a few moist crumbs attached.
9. Once baked, remove the pan from the oven and let the bars cool in the dish for 10–15 minutes. This resting time helps them set up and remain chewy rather than crumbly.
10. Carefully transfer the bars to a wire rack to cool completely before slicing. When fully cooled, cut into 24 equal squares or rectangles and enjoy!
SERVING SUGGESTIONS FOR CHRISTMAS COOKIE BARS
Serving these festive bars is where you can let your creativity shine. Whether you’re presenting them at a holiday brunch, gifting them to neighbors, or simply tucking into one (or two!) by the fireplace, these suggestions will elevate every bite:
- Festive Platter Display
Arrange the bars on a decorative platter lined with a holiday napkin or evergreen sprigs. Add extra M&M’s or a light dusting of powdered sugar for a snowy effect, and serve alongside peppermint bark or gingerbread cookies to create a themed dessert table.
- Hot Beverage Pairing
Place a few bars on a small dessert plate next to a mug of steaming hot cocoa, mulled cider, or your favorite spiced coffee. The warmth of the drink enhances the buttery sweetness of the bars, making each bite feel extra cozy.
- Gift-Wrapped Goodies
Stack two or three bars and wrap them in clear cellophane tied with festive ribbon. Attach a handwritten gift tag for that personal touch—these make delightful stocking stuffers or thoughtful neighbor gifts.
- Dessert Bar Bundle
Pair small squares of cookie bars with slices of fruitcake, mini bundt cakes, and bite-sized pie slices on a tiered cake stand. This combo offers guests a variety of textures and flavors, turning your gathering into a luxurious holiday dessert buffet.
HOW TO STORE CHRISTMAS COOKIE BARS
Proper storage ensures your Christmas cookie bars maintain their chewiness, color, and fresh-baked taste. Whether you’re stashing extras for later or keeping them fresh for a party, follow these guidelines to enjoy that perfect bite every time:
- Room-Temperature Airtight Container
Place cooled bars in a single layer (or separate layers with parchment paper) inside an airtight container. Store at room temperature away from direct sunlight for up to 4 days, preserving their soft texture and candy crunch.
- Refrigeration for Extra Freshness
If you prefer a firmer texture or live in a warm climate, store the bars in the refrigerator. Seal them in an airtight container; they’ll keep well for up to 1 week. Bring to room temperature before serving to soften.
- Freezing for Long-Term Storage
Wrap individual bars in plastic wrap, then place them in a freezer-safe bag or container. Freeze for up to 3 months. Thaw at room temperature or gently warm in the oven at 300°F (150°C) for 5–7 minutes for that fresh-baked taste.
- Pre-Cut Portions
For on-the-go snacking, pre-cut bars into squares and store in a resealable bag with parchment paper between layers. Keep at room temperature or in the fridge, so you always have a grab-and-go holiday treat ready.
CONCLUSION
These festive, chewy Christmas cookie bars are a holiday baking triumph, blending buttery dough, sweet white chocolate, and vibrant M&M’s into one unforgettable dessert. From the moment you gather your ingredients to the delightful crackle of the bars as you slice through them, this recipe is designed to bring joy and convenience to your holiday kitchen. With a prep time of just 15 minutes, and 25–30 minutes in the oven, you’ll have 24 colorful bars ready for sharing, gifting, or savoring while you deck the halls. Feel free to customize with different mix-ins, extra drizzle, or festive sprinkles to suit your style. Remember, you can print this article and save it for reference whenever you’re ready to bake up a batch of holiday magic.
We’ve covered everything from key ingredients and step-by-step instructions to serving suggestions and storage tips, so you can confidently whip up these cookie bars for gatherings or quiet nights by the tree. Don’t forget to check out the FAQ below for answers to common questions. If you try this recipe or need any help along the way, drop a comment, share your feedback, or ask any questions—you’re part of our holiday baking family now, and I can’t wait to hear how your Christmas cookie bars turn out! Enjoy every sweet, colorful bite.
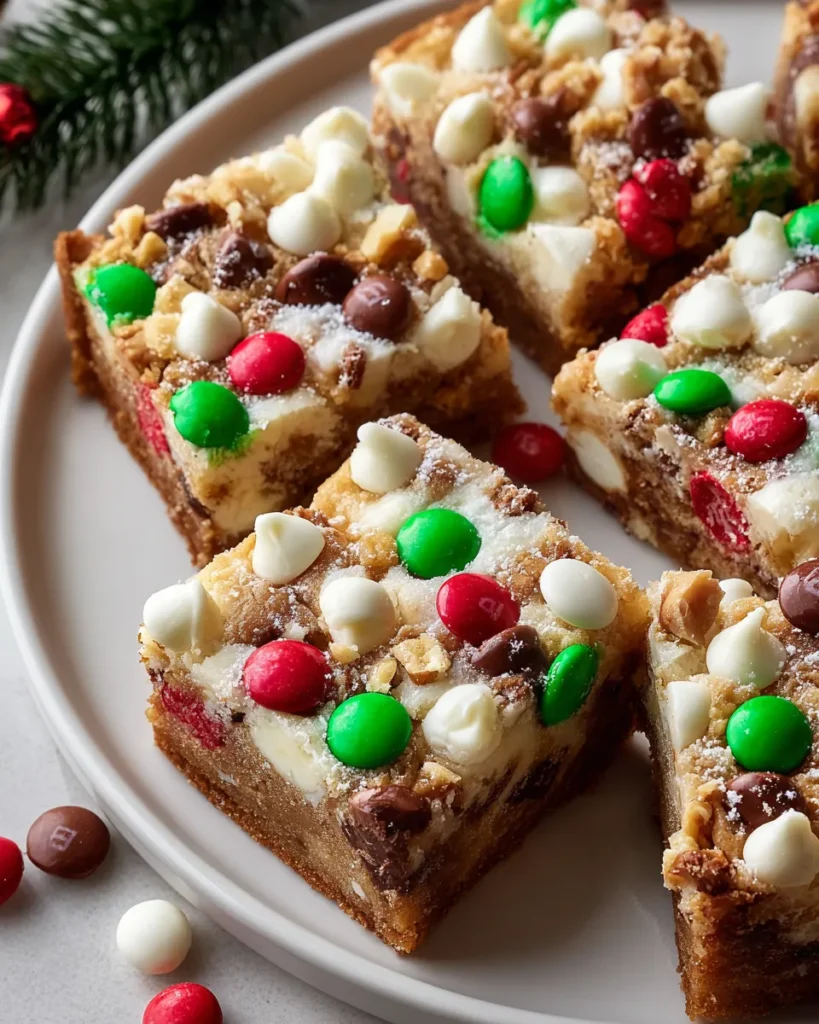

Christmas Cookie Bars
Description
These vibrant cookie bars blend buttery goodness with sweet white chocolate and colorful M&M's, making them a must-bake for the holiday season.
Ingredients
Instructions
-
Preheat your oven to 350°F (175°C). Grease a 9x13-inch baking dish or line it with parchment paper for easy removal.
-
In a medium bowl, whisk together the all-purpose flour, baking soda, and salt. Set aside.
-
In a large mixing bowl, cream together the softened butter, granulated sugar, and brown sugar until the mixture is light and fluffy.
-
Add the eggs, one at a time, to the butter-sugar mixture, mixing well after each addition. Stir in the vanilla extract.
-
Gradually add the dry ingredients to the wet ingredients, mixing just until combined. Be careful not to overmix.
-
Fold in the white chocolate chips, holiday-themed M&M's, and chopped nuts if using.
-
Spread the cookie bar dough evenly in the prepared baking dish using a spatula or your hands.
-
Bake in the preheated oven for 25-30 minutes, or until the edges are lightly golden and a toothpick inserted in the center comes out clean.
-
Once baked, remove from the oven and allow the cookie bars to cool in the pan for about 10-15 minutes. Then, transfer to a wire rack to cool completely.
-
Once cooled, cut into squares or rectangles and serve, or store in an airtight container at room temperature.
Note
- These cookie bars can be customized with your favorite mix-ins, such as dried fruit or different types of chocolate chips.
- Consider drizzling melted chocolate on top for an extra festive touch.
- They make great gifts when wrapped in decorative boxes.
- These bars can be frozen; just ensure they are well-sealed in an airtight container.
- For a colorful presentation, add extra M&M's or sprinkles on top before baking.

