

This holiday season has us reaching for every dazzling decoration and festive recipe that puts a smile on everyone’s face. Festive and Fun Christmas Tree Brownie Bites – The Perfect Holiday Treat! deliver everything from chewy chocolate bliss to playful holiday styling, making them a shining star at any gathering. There’s something special about taking a simple brownie mix and transforming it into miniature edible evergreen wonders that sparkle with edible glitter, candy ornaments, and a tiny star on top. My family couldn’t wait for me to bake these for last year’s cookie swap, and the moment I pulled that tray from the oven, rich chocolate scents began to swirl around the room. Kids gathered around the counter, wide-eyed with excitement, begging for a sneak taste of the untrimmed edges. It still makes me laugh thinking about my youngest trying to balance an M&M on a cooling tray!
These adorable brownie bites are the kind of holiday baking that doubles as a craft project and a decadent dessert. With a total prep time of 20 minutes, 25 minutes in the oven, and a 30-minute rest, you’ll spend more time chatting over hot cocoa than hovering by the stove. Designed for beginners but loved by seasoned bakers, this course type is pure dessert perfection—each brownie bite clocks in at just 120 calories and yields about 12 festive treats. Whether you’re hosting a cookie exchange, gifting neighbors, or turning a quiet afternoon into a family tradition, these colorful confections fit every Christmas occasion. From trimming Christmas trees to trimming brownie edges, you’ll find joy in every sprinkle, swirl, and star-topped finish.
KEY INGREDIENTS IN CHRISTMAS TREE BROWNIE BITES
Before we dive into the steps, let’s talk about the simple yet magical lineup of ingredients that bring these Christmas Tree Brownie Bites to life. Each item plays a special role—from delivering that rich chocolate foundation to adding a pop of festive color and sparkle.
- Brownie mix
This is the quick-and-easy base that delivers fudgy, chewy texture. Combined with eggs, oil, and water, it bakes into a perfectly rich canvas for our holiday decorations.
- Green frosting
Whether store-bought or homemade, this bright icing transforms each brownie into a tiny evergreen. Its creamy consistency clings to the brownie tops and holds decorations in place.
- Powdered sugar
When whisked with milk, it becomes a thin icing glaze. This glaze acts like edible glue, ensuring the green frosting hugs the brownies securely.
- Milk
A small splash makes the powdered sugar come together into a smooth glaze. It helps the frosting stick and adds a subtle sweetness.
- Edible glitter or sprinkles
These sugar crystals or confetti pieces mimic twinkling lights, adding shimmer and texture to each mini tree.
- Mini candy stars or yellow star-shaped sprinkles
The finishing jewel that perches on each brownie tree, giving it that perfect holiday silhouette.
- Red and green candy pieces
Tiny candies like M&M’s or Skittles become “ornaments,” popping against the green frosting and making each bite playful and colorful.
- Mini cupcake liners (optional)
These help display your brownie bites beautifully on a platter, keeping each treat neat and easy to serve.
HOW TO MAKE CHRISTMAS TREE BROWNIE BITES
Let’s roll up our sleeves and turn that boxed mix into a festive forest of brownie bites! Below is a step-by-step guide to get you from mixing bowl to beautifully decorated brownie trees.
1. Preheat your oven to the temperature specified on your brownie mix box. Prepare a baking pan by greasing it lightly or lining it with parchment paper so the brownies release effortlessly after baking.
2. In a mixing bowl, combine the brownie mix, eggs, oil, and water exactly as directed on the box. Use a whisk or spatula to mix until the batter is smooth and all dry streaks disappear.
3. Pour the batter into the prepared pan and use a spatula to spread it into an even layer. Slide the pan into the preheated oven and bake for the time suggested (usually around 20–25 minutes), or until a toothpick inserted in the center comes out clean.
4. When baking is complete, remove the pan from the oven and allow the brownies to cool completely on a wire rack or countertop. This resting time (about 30 minutes) ensures clean cuts later.
5. Once fully cooled, cut tree shapes using a Christmas tree cookie cutter. If you don’t have one, trim squares or rectangles freehand into tree silhouettes with a sharp knife.
6. In a separate bowl, stir together the powdered sugar and milk until you have a thin, pourable icing glaze. This glaze will help your frosting adhere.
7. Dip the top edge of each brownie tree into the glaze to moisten it lightly. Immediately spread a generous layer of green frosting on that moistened surface, sculpting little branches.
8. While the frosting is still wet, sprinkle edible glitter or multicolored sprinkles over the green surface. Press on red and green candy pieces to mimic holiday ornaments.
9. Gently place a mini candy star or yellow star-shaped sprinkle atop each brownie tree for the crowning touch.
10. Optionally, arrange the finished brownie bites in mini cupcake liners on a serving platter. Create festive patterns—like concentric circles or a large tree formation—for maximum holiday cheer.
SERVING SUGGESTIONS FOR CHRISTMAS TREE BROWNIE BITES
Now that your Christmas Tree Brownie Bites are beautifully frosted and decorated, let’s talk about serving them in style. These bite-sized treats are incredibly versatile and shine under holiday lights, making them perfect for gatherings of all kinds. From cozy family movie nights to bustling office parties, presenting these mini trees with a few simple touches will elevate your dessert table. Over the years, I’ve learned that the little details—like a sprinkling of powdered sugar snow or a bed of fresh evergreen sprigs—can transform a platter into a festive centerpiece. Whether you’re arranging treats for kids or adults, incorporating elements like color-coordinated linens, wooden serving boards, or holiday-themed stands will highlight the cheerful green frosting and candy decorations.
- Hot cocoa pairing
Serve your brownie bites alongside mugs of rich, creamy hot chocolate topped with whipped cream. The chocolate-on-chocolate combo is decadent, and the contrast of warm drink with cool frosting is delightful.
- Festive platter display
Arrange the brownies on a large wooden board lined with fresh evergreen sprigs. Add small glass votives or tea lights for a cozy glow that makes your dessert feel extra special.
- Gift packaging
Slide a few brownie bites into clear cellophane bags tied with red and green ribbons. Include a little holiday tag for a charming homemade gift neighbors and coworkers will adore.
- Dessert buffet accent
Place these mini trees around larger desserts—like yule logs or gingerbread houses—to add height and color variation. Guests will love the mix-and-match feel of your dessert spread.
HOW TO STORE CHRISTMAS TREE BROWNIE BITES
Keeping your Christmas Tree Brownie Bites fresh and picture-perfect is easy with the right storage approach. Whether you’re prepping these bites a day in advance or saving leftovers, proper storage ensures that the frosting stays creamy and the brownie base remains delightfully moist. Over the holidays, counter space can become precious real estate—nestling your brownies carefully will prevent them from losing their decorative sparkle. If you need to make these treats early for a party, plan ahead by frosting and decorating them no more than one day before serving. For longer storage, tightly sealing them helps lock in moisture and prevents the candy decorations from picking up unwanted flavors or humidity.
- Airtight container at room temperature
Place cooled brownie bites in a single layer in an airtight container. Use parchment paper between layers if stacking. Store at room temperature for up to 2 days to maintain chewy texture.
- Refrigeration for extended freshness
For up to 5 days of storage, keep the brownie bites in a tightly sealed container in the fridge. Let them come to room temperature for about 10 minutes before serving, so the frosting regains its creamy consistency.
- Freezing un-frosted pieces
If you need to prep far ahead, cut and freeze the brownie shapes before decorating. Wrap each tree in plastic wrap and place them in a freezer-safe bag. Defrost in the fridge overnight, then proceed with glazing and frosting.
- Separate icing storage
If you’re worried about decorations shifting, store icing and candy ornaments in small sealed bags. Decorate the brownie bites just before serving to keep everything crisp and vibrant.
CONCLUSION
What a joyful journey these Christmas Tree Brownie Bites have taken us on! From that very first mix of boxed batter to the last sprinkle of edible glitter, you’ve transformed simple ingredients into show-stopping holiday desserts. We’ve covered everything—from gathering pantry staples like powdered sugar and green frosting to mastering each step: preheating, mixing, cutting, glazing, frosting, and decorating. With a total active time of just 20 minutes of prep and 25 minutes of baking, plus a quick rest, you’ll have a platter of 12 adorable brownie trees ready in under an hour. And at around 120 calories apiece, they’re a lighter holiday indulgence that doesn’t skimp on flavor or festive flair. Whether you’re a holiday baking novice or a seasoned sweet-maker, these brownie bites are designed to bring cheer to every kitchen. Don’t forget that this is a beginner-friendly recipe, perfect for baking alongside kids or hosting a holiday decorating party with friends.
Feel free to print this article and save it for your holiday binder or digital recipe collection—refer back anytime you need a festive chocolate fix. You’ll also find a FAQ section below to answer any questions about ingredient swaps, frosting consistency, or storage. If you give these Christmas Tree Brownie Bites a try, please let me know how they turned out! Leave a comment with your favorite decoration combo, ask questions if you hit any snags, or share your own tips for making these treats even more spectacular. Your feedback and stories make this whole baking adventure so much more fun and inspiring. Happy holiday baking!
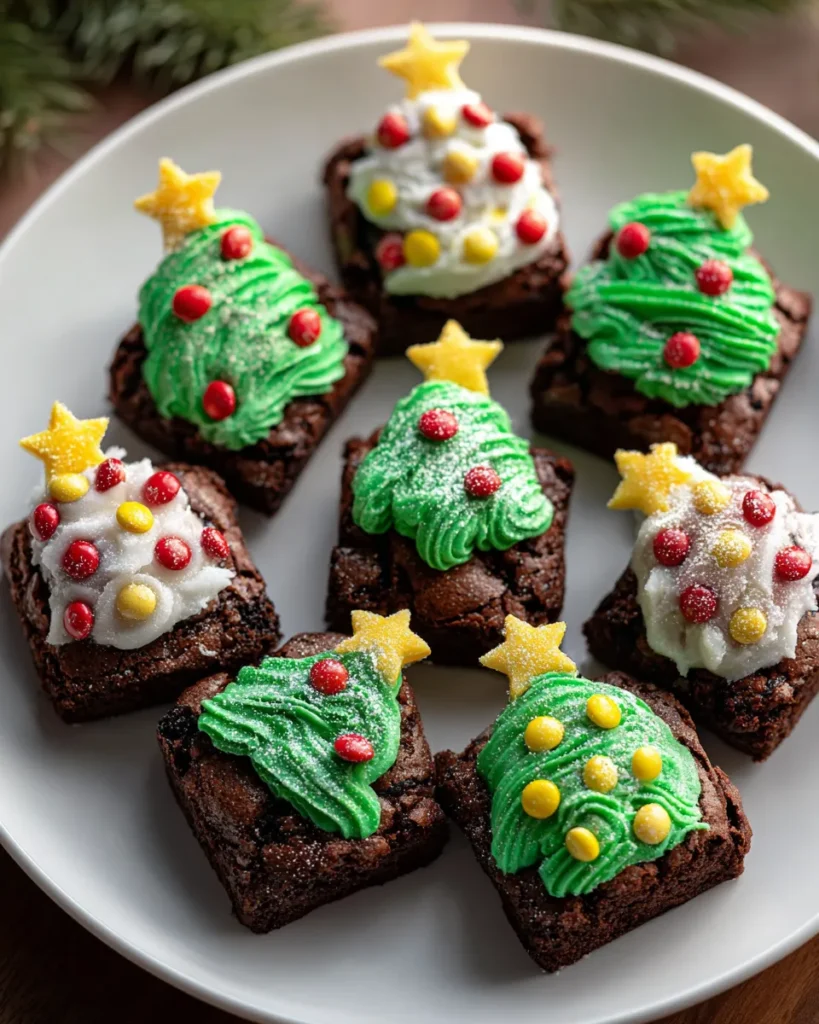

Christmas Tree Brownie Bites
Description
These adorable brownie bites are rich, chocolatey, and topped with vibrant green frosting. Decorate with sprinkles and candy to create a delightful holiday dessert everyone will love.
Ingredients
Instructions
-
Preheat your oven to the temperature specified on your brownie mix box. Prepare a baking pan according to package instructions, typically greased or lined with parchment paper.
-
In a mixing bowl, prepare the brownie batter according to the instructions on the box (mix together brownie mix, eggs, oil, and water).
-
Pour the brownie batter into the prepared baking pan, spreading it evenly. Bake for the time suggested on the brownie mix box, usually around 20-25 minutes or until a toothpick inserted comes out clean.
-
Once baked, remove from the oven and allow the brownies to cool completely in the pan.
-
Once cooled, use a cookie cutter shaped like a Christmas tree to cut out tree shapes from the brownies. If you don’t have a tree-shaped cutter, you can cut the brownies into squares or rectangles and then trim them into tree shapes freehand.
-
In a separate bowl, mix the powdered sugar and milk to create a thin icing glaze. This will be used to help the green frosting stick to the brownies.
-
Dip the top of each brownie tree into the icing glaze to moisten it slightly, then immediately spread a thick layer of green frosting on top to create the appearance of a decorated Christmas tree.
-
While the frosting is still wet, sprinkle edible glitter or sprinkles over the frosting to mimic ornaments. Add red and green candy pieces as ornaments to your brownie bites.
-
Place a mini candy star or yellow star-shaped sprinkle on top of each brownie tree for the finishing touch.
-
Optionally, line a serving platter with mini cupcake liners to display the brownie bites beautifully. Arrange the brownie trees in any festive pattern you like.
Note
- These brownie bites can easily be customized by using different colored frostings for a variety of holiday looks.
- Leftover brownie scraps can be crumbled and used as toppings for ice cream or desserts.
- These treats are perfect for holiday parties, gift exchanges, or simply as a fun family baking activity.

