

If you've ever craved that irresistible crunch combined with a bright, tangy flavor that makes your taste buds dance, then these Crunchy Tangy Refrigerator Pickled Vegetables are about to become your new favorite go-to. Brighten your meals with these crunchy, tangy refrigerator pickled vegetables! They’re a simple yet magical way to transform everyday veggies into a colorful feast for the eyes and palate. With every bite, you’ll experience a burst of flavors that highlights the natural sweetness of carrots, the cool freshness of cucumbers, and the peppery snap of radishes, all wrapped up in a palate-tingling vinegar brine. Perfect as a lunchtime companion or an afternoon pick-me-up, these pickles take center stage in a fresh salad, jazz up a sandwich, or simply shine on their own as a healthy, low-calorie snack.
Plus, this easy recipe is rated as a beginner-friendly lunch course and takes only 20 minutes of prep, 10 minutes of cooking, and a 24-hour rest in the fridge, yielding four satisfying servings at about 40 calories each. No fancy equipment or complicated canning process—just simple ingredients, a sprinkle of spices, and a little patience. Experience a burst of flavors with these crunchy, tangy pickled veggies. They’re the kind of refrigerator pickles you’ll reach for again and again, whether you’re looking for a vibrant summer side, a tangy recipe twist, or a guilt-free snack to satisfy that midafternoon craving.
I still remember the first time I made this recipe on a lazy Sunday afternoon, chopping a rainbow of vegetables while my kitchen playlist hummed in the background. By the time the vinegar brine came to a gentle simmer, my entire house smelled like pure zest. After a 24-hour cooling period, I dove in with a fork and was instantly hooked on the lively texture and refreshing sharpness dancing between each crunchy bite. It quickly became my ultimate backyard BBQ side and the perfect contrast to grilled burgers or tacos. Every jar I share with friends sparks stories of our own kitchen experiments, and I can’t wait to hear about your pickling adventures—have you tried adding a dash of hot sauce or a twist of different veggies? Let’s swap tips and celebrate the joy of homemade refrigerator pickles together.
KEY INGREDIENTS IN CRUNCHY TANGY REFRIGERATOR PICKLED VEGETABLES
To achieve that perfect balance of crunch and tang, it’s essential to assemble fresh, high-quality ingredients. Each component plays a unique role in flavor, texture, and preservation, so let’s break down what you’ll need and why it matters:
- Cucumbers
Provide a crisp, hydrating base with a mild flavor that soaks up the zesty brine beautifully, giving each bite a refreshing snap.
- Carrots
Add a natural sweetness and vibrant color. Their firm texture holds up well in the brine, offering extra crunch and visual appeal.
- Radishes
Bring a peppery bite and bright hue that cut through the acidity, adding dimension and a satisfying snap to the mix.
- Bell peppers
Offer a sweet, juicy crunch along with vivid color pops. Any color works, so feel free to mix red, yellow, or orange for a festive look.
- Red onion
Delivers a sharp, tangy edge and lovely purple streaks. Its layers transform into tender ribbons that balance the sharper vegetable notes.
- Garlic cloves
Infuse the brine with a subtle savory warmth. Smashing them releases essential oils, enhancing aroma and depth.
- White vinegar
Serves as the pickling powerhouse, providing tang and acidity that preserves the vegetables while creating that signature zing.
- Water
Dilutes the vinegar to the perfect acidity level, ensuring the brine isn’t overpowering and the vegetables stay crisp.
- Sugar
Balances the acidity with just a touch of sweetness, rounding out the flavor profile and mellowing the sharp edges.
- Salt
Functions as both a seasoning and a textural enhancer by drawing out moisture and firming up the vegetables for the ideal crunch.
- Mustard seeds
Add a gentle, fragrant heat and subtle crunch, imparting aroma and complexity to the brine.
- Coriander seeds
Contribute warm, citrusy notes and a faint floral flavor that complements the sharp vinegar tang.
- Black peppercorns
Offer a classic, earthy spiciness that deepens the brine’s flavor and adds tiny bursts of heat.
- Red pepper flakes
(Optional) Introduce extra kick and visual specks of heat—perfect for anyone craving a spicier tangy recipe.
- Fresh dill sprigs
(Optional) Provide an herbal brightness and decorative flourish. Nestle them in the jars for a light, fragrant finish.
HOW TO MAKE CRUNCHY TANGY REFRIGERATOR PICKLED VEGETABLES
Ready to dive into the pickling process? This beginner-friendly method shows you how to layer fresh veggies with a perfectly spiced brine, all without the fuss of traditional canning. Just follow these simple steps to create refrigerator pickles bursting with flavor and crunch:
1. Prepare your vegetables. Wash each veggie thoroughly under cool running water. Slice cucumbers into thin rounds, julienne the carrots, thinly slice the radishes, cut bell peppers into strips, and slice the red onion into delicate rings.
2. Combine in a mixing bowl. Place all the sliced vegetables and smashed garlic cloves into a large bowl. Gently toss until every piece is evenly coated and mixed.
3. Make the brine. In a medium saucepan over medium heat, add white vinegar, water, sugar, salt, mustard seeds, coriander seeds, black peppercorns, and red pepper flakes (if using). Stir continuously until the sugar and salt fully dissolve.
4. Simmer and cool. Bring the vinegar mixture to a gentle simmer, then immediately remove from heat. Let it cool for about 10–15 minutes to avoid shocking the vegetables with scalding liquid.
5. Pack your jars. While the brine cools, prepare clean, sterilized jars (pint-sized mason jars work best). Tightly pack the mixed vegetables in, making sure not to crush them.
6. Pour in the brine. Once slightly cooled, carefully pour the brine over the vegetables, ensuring all pieces are submerged, and leave about half an inch of headspace at the top of each jar.
7. Add fresh herbs. If you like, tuck in a few sprigs of fresh dill for both flavor and a beautiful presentation.
8. Seal and cool. Seal the jars with their lids, then let them cool completely at room temperature before moving to the refrigerator to ensure safe storage.
9. Refrigerate and rest. Place the sealed jars in the fridge and let the pickles develop flavor for at least 24 hours. They can be enjoyed for up to two weeks, growing tangier and more vibrant each day.
SERVING SUGGESTIONS FOR CRUNCHY TANGY REFRIGERATOR PICKLED VEGETABLES
Bringing these pickles to the table is where the real fun begins. Their vibrant hues and lively tang make them a versatile companion across countless dishes. Whether you’re grilling up burgers on the patio, layering a hearty sandwich for work, or simply craving a healthy snack, these refrigerator pickles deliver the perfect balance of acidity, sweetness, and crunch. They uplift any meal by adding visual interest and a zesty kick that cuts through rich, fatty flavors. Even plain rice bowls or cold pasta salads become extraordinary with a scattering of these crunchy gems. For an extra twist, serve them chilled on a charcuterie board alongside olives, cheeses, and sliced meats—your guests will rave about that pop of color and brightness.
- Serve in sandwiches to replace or complement mayo, adding a crisp, tangy layer that livens up deli meats, grilled veggies, or even vegan fillings.
- Top tacos (fish, chicken, or vegetarian) with a handful of pickled veggies for instant flavor contrast and textural excitement.
- Plate as a side dish beside grilled proteins—burgers, hot dogs, or salmon—so every bite alternates between smoky and tangy.
- Arrange on a snack platter with hummus, pita chips, and cheese cubes; the pickles’ acidity cuts through creamy dips for a well-rounded bite.
HOW TO STORE CRUNCHY TANGY REFRIGERATOR PICKLED VEGETABLES
Proper storage is key to preserving that coveted crunch and tangy flavor. These refrigerator pickles thrive in a cool environment, where the brine continues to infuse the vegetables without compromising their texture. Always use clean utensils to scoop out servings—this prevents unwanted bacteria from sneaking in and ensures your pickles stay fresh longer. Make sure the jars are sealed tightly to maintain the right acidity and prevent air exposure, which can soften the vegetables. Keep the pickles at the back of the fridge where temperatures are most consistent, avoiding door placement where cold air fluctuates. Over time, the pickles will become tangier; if you prefer a milder bite, enjoy them within the first week. Here are some essential tips:
- Refrigerate promptly after sealing the jars and allow the pickles to rest undisturbed for at least 24 hours.
- Use airtight glass containers (like mason jars) to maintain acidity and prevent metallic flavors.
- Always serve with clean utensils to avoid cross-contamination, ensuring crunch and safety.
- Consume within two weeks for optimal texture and flavor—after that, they’ll still be edible but may soften.
CONCLUSION
We’ve journeyed from slicing a medley of fresh vegetables to crafting a beautifully spiced vinegar brine, packing each jar, and patiently waiting for that tangy magic to unfold. This beginner-friendly recipe offers an easy recipe for anyone looking to enjoy healthy snacks, tangy recipes, or colorful summer sides without the intimidation of traditional canning. With just 20 minutes of hands-on prep, 10 minutes of simmering, and a 24-hour chill in the fridge, you’ll have four servings of vibrant, crunchy refrigerator pickles at roughly 40 calories per serving. Feel free to experiment with extra vegetables—like zucchini or cauliflower—or adjust sugar and salt levels to make these pickles truly your own. Whether you follow the classic blend of cucumbers, carrots, radishes, peppers, and onions or add your personal spin, the result is always a burst of flavor that brightens up lunches, BBQs, and snack times alike. Don’t forget you can print and save this article for quick reference, and scroll down to find an FAQ section with answers to all your pickling curiosities.
I’d love to hear how your pickling adventure turns out! Share your experiences, tweaks, or questions—whether you’re curious about swapping spices, adjusting brine ratios, or need troubleshooting tips, drop a comment below. Your feedback not only helps me refine future tangy recipes but also builds a vibrant community of home cooks who celebrate flavor, creativity, and that satisfying crunch. Happy pickling, and here’s to filling your fridge with jars of sunshine and zest for weeks to come!
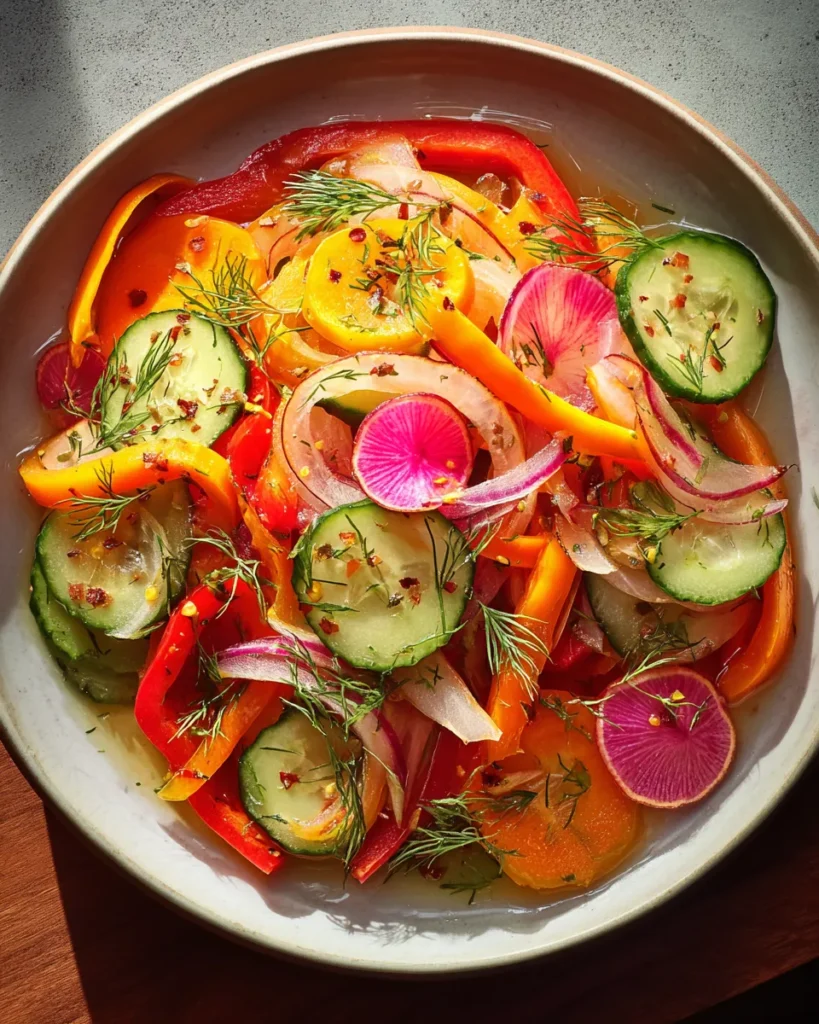

Crunchy Tangy Refrigerator Pickled Vegetables
Description
Experience a burst of flavors with these crunchy, tangy pickled veggies. They're easy to make and perfect for enhancing any dish or enjoying on their own!
Ingredients
Instructions
-
Start by preparing your vegetables. Wash them thoroughly and cut them into the specified shapes: cucumbers into rounds, carrots into julienne strips, radishes into thin slices, bell peppers into strips, and the red onion into thin slices.
-
In a large mixing bowl, combine all the sliced vegetables along with the smashed garlic cloves. Toss them gently until they are evenly mixed.
-
In a medium saucepan over medium heat, combine the white vinegar, water, sugar, salt, mustard seeds, coriander seeds, black peppercorns, and red pepper flakes (if using). Stir the mixture until the sugar and salt dissolve completely.
-
Bring the vinegar mixture to a simmer, and then remove it from the heat. Allow it to cool for about 10 to 15 minutes.
-
While the brine is cooling, prepare clean, sterilized jars (pint-sized mason jars work wonderfully). Place the mixed vegetables into the jars, packing them tightly but not so much that they are crushed.
-
Once the brine has cooled slightly, pour it over the vegetables in the jars, ensuring that all the vegetables are submerged. Leave about half an inch of headspace at the top of the jar.
-
If desired, you can add fresh dill sprigs to the jars for added flavor and a beautiful presentation.
-
Seal the jars with their lids and allow them to cool completely at room temperature before transferring them to the refrigerator.
-
Let the pickled vegetables sit in the refrigerator for at least 24 hours before tasting for the best flavor. They can be enjoyed for up to 2 weeks, getting tangier over time.
Note
- Feel free to experiment with different vegetables like zucchini, asparagus, or even cauliflower for a unique twist.
- This recipe is highly customizable; adjust the sugar and salt levels to suit your taste preferences.
- These pickled vegetables are perfect as a crunchy side dish, on sandwiches, or as a topping for tacos.
- Consider adding a splash of your favorite hot sauce to the brine for an extra kick.
- These pickled veggies make excellent gifts when presented in decorative jars with labels.

